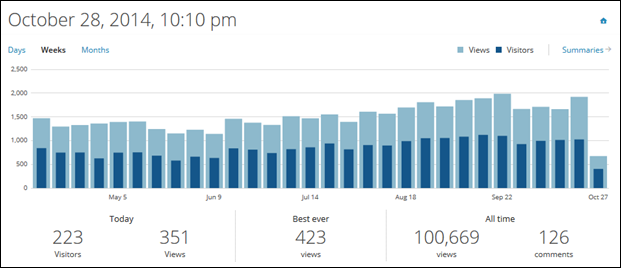
This week my blog reach more than 100,000 views 
Thanks to everyone visit my blog and view my posts, I hope you found my posts are useful for you and help you in your work.
Writing posts to my blog has been a great experience that has opened up many doors, it helps me to increase my knowledge, experience, friendships, and opportunities.
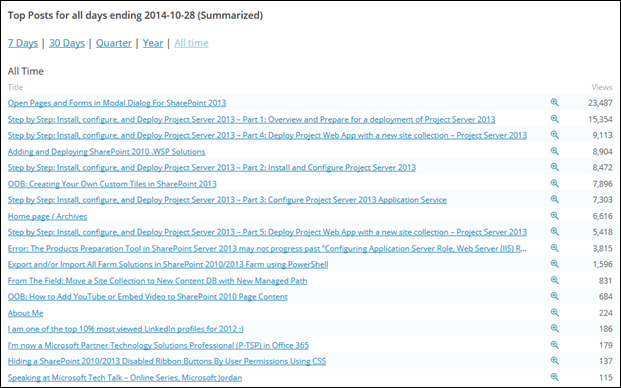
Thanks All, and I hope to unlocked the next achievement 500K+ views  , and I like to share my statistics with you:
Statistics Chart


World Map

Top Posts and Pages

Tags: 000 Views, 100, 100k Views, Achievement, Achievement Unlocked, Ali, Blog, Mustafa, Nimer, Posts, Reach, SharePoint
Any SharePoint Client, User, or Developer need an SMTP server to send e-mails to Internal or External SharePoint site users from a Workflow, Alerts, Request Site Access, and/or Any custom Apps that use SharePoint Outgoing e-mail setting to send e-mails.
SharePoint cannot be configured to send e-mail over encrypted port to the e-mail service. And Office 365 and Gmail required an SMTP connection that supports TLS encryption  .
.
Fortunately, Windows Server (2008-2012) supports an SMTP relay for Office 365 and Gmail by install a local SMTP Rely Server that supports an encrypted connection (over TCP Port 587)  .
.
The Steps are easy and forward:
-
Install SMTP Role (Windows Server 2008 and 2012)
-
Configuring SMTP Service to Relying to Office365/Gmail SMTP
-
Testing the SMTP Service Connection
-
Configuring Outgoing E-Mail settings in SharePoint Servers
-
Test Sending an E-mail from SharePoint Site
The following is the detailed steps:
Read the rest of this entry »
Tags: configure, configure smtp relay, Configuring SMTP, e-mail, email, Gmail, Install SMTP Role, Office365, outgoing, Outgoing E-Mail, relay, SharePoint, SharePoint 2010, SharePoint 2013, SMTP
Many SharePoint users asking “Can we hide Ribbon buttons for current login user (by his permissions) rather than show it as disabled button !?
The answer is YES. When user did not have contribute permissions (like Add Item, Edit Item …etc.), these buttons will be shown in the Ribbon, but not active (Disabled), so the Ribbon button will not be clickable as following:
In SharePoint 2010

In SharePoint 2013 / Online

So, to hide these buttons in easy and simple way, we will use an existing CSS class in SharePoint 2010, 2013, and Online version. The CSS class name is “.ms-cui-disabled”, and this CSS class is added to all disabled buttons in the Ribbon?!? So the idea is to override the behavior of this CSS class in Master Page and hide any button that use this CSS class.
Read the rest of this entry »
Tags: .ms-cui-disabled, Disabled Ribbon Buttons, Hiding a SharePoint 2010 2013 Disabled Ribbon Buttons By User Permissions Using CSS, SharePoint, SharePoint Online
This article contain detailed steps to install SQL server 2008 R2 with best practices and guidelines from Microsoft and other many blogs over the internet, and I try to put all these best practices and guidelines in one article with step by step installation guide.
Pre-Installation Steps
Before install SQL server 2008 R2, we need to check the pre-install requisites:
Operating Systems Requirements:
- Plan to install SQL on a NTFS file system
- Do no try to install SQL Server on a compressed, encrypted or read-only drive, because setup will block the installation
- Do not install SQL Server on a Domain Controller.
- Verify Windows Management Instrumentation service (Control Panel -> Administrative Tools -> Services) is running
- Configure your firewall to allow SQL Server access. Click here for more information about protocols and port numbers
- Create dedicated service account for each service to be installed. Ensure that these accounts are not member of Local Administrator because it will give unnecessary rights to these accounts, see SQL services accounts
- The user account that is running SQL Server Setup must have administrative privileges on the computer, see SQL services accounts
- Group all SQL services accounts in one AD Organization Unit for easy management and understandable hierarchy.
- At least 6.0 GB of disk space are required by SQL Server setup
Additional software requirements and hardware requirements:
- Enable .NET Framework 3.5.
- PowerShell 2.0.
Note: run Windows Updates to get latest updates after install and check all previous requirements.
Read the rest of this entry »
Tags: Install, Install SQL server 2008 R2 for SharePoint 2010, SharePoint, SharePoint 2010, SQL, SQL Server, Step by Step
When you try to install Microsoft SharePoint Server 2013 on some Windows Server 2012 configurations, the Products Preparation Tool may be unable to correctly configure and install the required Windows Features for SharePoint. If this occurs, the tool will continuously try to configure and install the required features and then restart.
When this problem occurs, the Products Preparation Tool does not progress past the “Configuring Application Server Role, Web Server (IIS) Role” stage.
To work around this issue, use one of the following methods in this article http://support.microsoft.com/kb/2765260, in my case, i used Method 2 – offline method
Also, please to note that: Currently, Microsoft SharePoint Server 2013 is not supported for installation on computers running the Windows Server 2012 R2 operating system. SharePoint Server 2013 with Service Pack 1 and SharePoint Foundation 2013 with Service Pack 1 will offer support for Windows Server 2012 R2.
for more information about SharePoint support for Windows Server 2012 R2, read the following articles:
SharePoint 2013 Support for Windows Server 2012 R2
Microsoft Support: SharePoint 2013 support for Windows Server 2012 R2
I Hope this useful for you,
Thanks.
Tags: Application Server Role, Error, Install SharePoint 2013, Products Preparation Tool in SharePoint Server 2013, SharePoint, SharePoint 2013, SharePoint 2013 prerequisites installer, Troubleshooting, Web Server (IIS) Role: configuration error
This is the Fifth and Final part for Step by Step: Install, configure, and Deploy Project Server 2013 Article,
Article Content’s Index:
- Part 1: Overview and Prepare for a deployment of Project Server 2013
- Part 2: Install and Configure Project Server 2013
- Part 3: Configure Project Server 2013 Application Service
- Part 4: Deploy Project Web App with a new site collection – Project Server 2013
- Part 5: Deploy Project Web App in an existing site collection – Project Server 2013
Deploy Project Web App in an existing site collection – Project Server 2013
For this post I create a Web Application with Top-Level Site collection. In Top-Level site, there is no link for PWA Setting in Site Action Menu. We want to enable PWA for this site collection

Deploying an instance of Project Web App to an existing site collection consists of the following:
- Enable the Project Web App site collection features
- Create a Project Web App site in an existing site collection
These steps will be created using PowerShell Script.
Read the rest of this entry »
Tags: configure, Deploy Project Server 2013, How To, Install, Project Server, Project Server 2013, SharePoint, SharePoint 2013
This is the Fourth part for Step by Step: Install, configure, and Deploy Project Server 2013 Article,
Article Content’s Index:
- Part 1: Overview and Prepare for a deployment of Project Server 2013
- Part 2: Install and Configure Project Server 2013
- Part 3: Configure Project Server 2013 Application Service
- Part 4: Deploy Project Web App with a new site collection – Project Server 2013
- Part 5: Deploy Project Web App in an existing site collection – Project Server 2013
Deploy Project Web App with a new site collection
In this part, we will deploy an instance of Project Web App along with a Project Web App site in a new site collection.
Not all steps in this post are required, such as create Web Application, and/or create Top-Level site collection, but I covered these steps in post for more usability and as a general reference.
Read the rest of this entry »
Tags: configure, Deploy Project Server 2013, Deploy Project Web App in an existing site collection – Project Server 2013, How To, Install, Project Server, Project Server 2013, SharePoint, SharePoint 2013
This is the Third part for Step by Step: Install, configure, and Deploy Project Server 2013 Article,
Article Content’s Index:
- Part 1: Overview and Prepare for a deployment of Project Server 2013
- Part 2: Install and Configure Project Server 2013
- Part 3: Configure Project Server 2013 Application Service
- Part 4: Deploy Project Web App with a new site collection – Project Server 2013
- Part 5: Deploy Project Web App in an existing site collection – Project Server 2013
Configure Project Server 2013 Application Service
After Project Server 2013 is installed, the following configuration steps are required before creating a Project Web App site and using Project Server:
Read the rest of this entry »
Tags: configure, Configure Project Server 2013 Application Service, Deploy Project Server 2013, How To, Install, Project Server, Project Server 2013, SharePoint, SharePoint 2013
Some times you need to open an internal or external pages inside an OOB modal dialog of SharePoint, such as New Task Form, Upload File Form. Or maybe you want to open external pages and sites.
I create a template functions to open pages in dialog, upload it to a central place, and use it any where I need it in my site collection.
In this post, I write how the JavaScript work and how to use it.
JavaScript File Overview
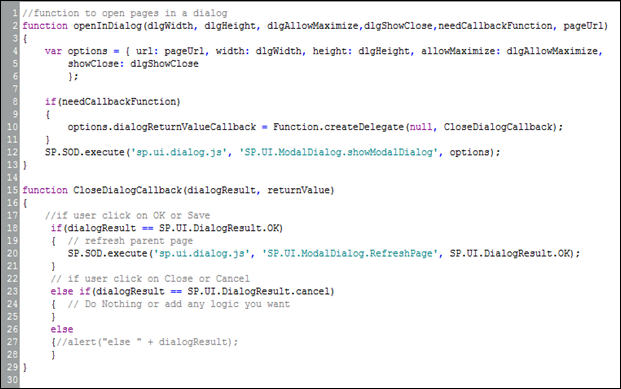
I have a JS file (SP15ModalDialog.js) that contains the modal dialog functions as following code:

- OpenInDialog function:
This function will be called in you links (onClick) or buttons (onClientClick). And it takes the following parameters:
- dlgWidth: Dialog width (ex: 600)
- dlgHeight: Dialog height (ex: 800)
- dlgAllowMaximize: Show maximize button in Dialog (true or false)
- dlgShowClose: Show close button in Dialog (true or false)
- needCallbackFunction: determine if you want to register call back function or not for Dialog (true or false)
- pageUrl: the URL of target page or site
- CloseDialogCallback function:
This function contains the logic of work to be done after you close, save, or cancel the dialog box, the main idea here is if you open a form in dialog and save data, you need to refresh the parent page to see changes that done. it contains 3 conditions
- If user click on OK or SAVE button – if(dialogResult == SP.UI.DialogResult.OK):
It will refresh the parent page (if needCallbackFunction is true)
- If user click on CANCEL or CLOSE button – else if(dialogResult == SP.UI.DialogResult.cancel)
Do nothing or add your custom code
- If dialogResult return other value – else : Do nothing or add your custom code
Read the rest of this entry »
Tags: Client Object Model, CSOM, Dialog, JavaScript, Modal, Open Pages in dialog, Popup, SharePoint, SharePoint 2013, SPModalDialog, Tips
When you open SharePoint 2013 Team Site, you will see a Metro Tiles Menu on home page.

The good news you can create your own custom tiles menu by using a new OOB List/App template that called : Promoted Links.
Create “Promoted Links” List
To do that, follow the steps:
- Go to Site Content

- Click on “Add an App”

- Select “Promoted Links” list template from available lists


- After creating the list click new item to add a new link and details

- Fill data about the link as below (and make sure you upload Tiles images in picture library):

- Title: the link title text
- Background image location: the image URL and alternative text
- Description: description text that will be shown when you mouse over the Tile
- Link Location: the target URL.
- Lunch Behavior: determine if you want to open URL in current page, new tab, or in modal dialog

- Order: order number of the tile
- Repeat step 4 to add more links

Read the rest of this entry »
Tags: Metro, Metro Links, Metro Menu, OOB, Promoted Links, SharePoint, SharePoint 2013, Tiles
![]()
![]() , and I like to share my statistics with you:
, and I like to share my statistics with you:


