RSS

Category Archives: Tips

Hiding a SharePoint 2010/2013 Disabled Ribbon Buttons By User Permissions Using CSS


Many SharePoint users asking “Can we hide Ribbon buttons for current login user (by his permissions) rather than show it as disabled button !?

The answer is YES. When user did not have contribute permissions (like Add Item, Edit Item …etc.), these buttons will be shown in the Ribbon, but not active (Disabled), so the Ribbon button will not be clickable as following:

In SharePoint 2010
image

In SharePoint 2013 / Online
image

So, to hide these buttons in easy and simple way, we will use an existing CSS class in SharePoint 2010, 2013, and Online version. The CSS class name is “.ms-cui-disabled”, and this CSS class is added to all disabled buttons in the Ribbon?!? So the idea is to override the behavior of this CSS class in Master Page and hide any button that use this CSS class.

Read the rest of this entry »


Tags: , , , ,

Open Pages and Forms in Modal Dialog For SharePoint 2013


Some times you need to open an internal or external pages inside an OOB modal dialog of SharePoint, such as New Task Form, Upload File Form. Or maybe you want to open external pages and sites.

I create a template functions to open pages in dialog, upload it to a central place, and use it any where I need it in my site collection.

In this post, I write how the JavaScript work and how to use it.

JavaScript File Overview

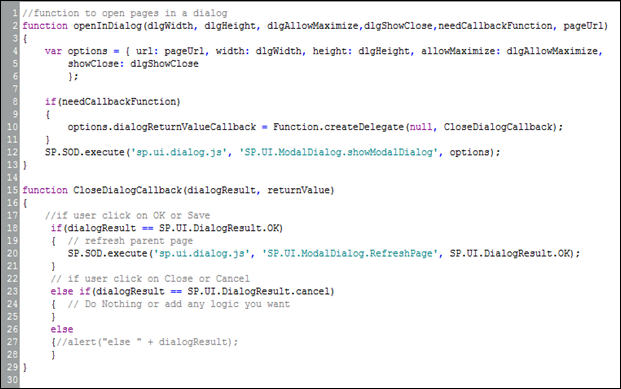
I have a JS file (SP15ModalDialog.js) that contains the modal dialog functions as following code:

image

  1. OpenInDialog function:
    This function will be called in you links (onClick) or buttons (onClientClick). And it takes the following parameters:

    • dlgWidth: Dialog width (ex: 600)
    • dlgHeight: Dialog height (ex: 800)
    • dlgAllowMaximize: Show maximize button in Dialog (true or false)
    • dlgShowClose: Show close button in Dialog (true or false)
    • needCallbackFunction: determine if you want to register call back function or not for Dialog (true or false)
    • pageUrl: the URL of target page or site
  2. CloseDialogCallback function:
    This function contains the logic of work to be done after you close, save, or cancel the dialog box, the main idea here is if you open a form in dialog and save data, you need to refresh the parent page to see changes that done. it contains 3 conditions

    • If user click on OK or SAVE button – if(dialogResult == SP.UI.DialogResult.OK):
      It will refresh the parent page (if needCallbackFunction is true)
    • If user click on CANCEL or CLOSE button – else if(dialogResult == SP.UI.DialogResult.cancel)
      Do nothing or add your custom code
    • If dialogResult return other value – else : Do nothing or add your custom code

Read the rest of this entry »

 
76 Comments

Posted by on February 25, 2013 in CSOM, SharePoint 2013, Tips


Tags: , , , , , , , , , ,

OOB: Creating Your Own Custom Tiles in SharePoint 2013


When you open SharePoint 2013 Team Site, you will see a Metro Tiles Menu on home page.

image

The good news you can create your own custom tiles menu by using a new OOB List/App template that called : Promoted Links.

Create “Promoted Links” List

To do that, follow the steps:

  1. Go to Site Content
    image
  2. Click on “Add an App”
    image
  3. Select “Promoted Links”  list template from available lists
    imageimage
  4. After creating the list click new item to add a new link and details
    image
  5. Fill data about the link as below (and make sure you upload Tiles images in picture library):
    image

    • Title: the link title text
    • Background image location: the image URL and alternative text
    • Description: description text that will be shown when you mouse over the Tile
    • Link Location: the target URL.
    • Lunch Behavior: determine if you want to open URL in current page, new tab, or in modal dialogimage
    • Order: order number of the tile
  6. Repeat step 4 to add more linksimage

Read the rest of this entry »


Tags: , , , , , , ,

Export and/or Import All Farm Solutions in SharePoint 2010/2013 Farm using PowerShell


Sometimes you may need to export all SharePoint 2010/2013 farm solutions as a backup process or to deploy them from staging environment to production environment.

Export Farm Solutions

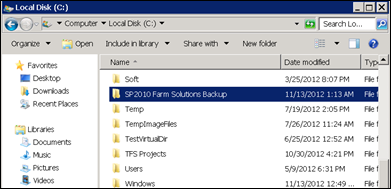
  1. Create a backup folder on “C” and give it a meaningful name like “SP2010 Farm Solutions Backup”.image
  2. Open SharePoint 2010 Management Shell
     image
  3. Change directory or navigate to backup folder
     image
  4. Enter the following Script to extract all farm solution to current location directory

    (Get-SPFarm).Solutions | ForEach-Object{$var = (Get-Location).Path + “\” + $_.Name; $_.SolutionFile.SaveAs($var)}


    image

    image

  5. Go and open the target folder to see all exported solutions Smile

Import Farm Solutions

After copy the folder that contains exported solution on production or target farm server.

  1. Open SharePoint 2010 Management Shell
  2. Change directory or navigate to folder that contains all solutions to be deployed
  3. Enter the following Script to extract all farm solution to current location directoryGet-ChildItem | ForEach-Object{Add-SPSolution -LiteralPath $_.Fullname}

     image
  4. So all solutions are added to the target farm.

For more information about adding and deploying SP2010 Farm solution, please to open and read Adding and Deploying SharePoint 2010 .WSP Solutions

Same scripts can be used for SharePoint 2013 Farm Solution

I Hope this useful for you,

Thanks.


Tags: , , , , , , , , ,